Category: Uncategorized

I wish that we still had BECTA….

I’ve been thinking a lot about BECTA the last few weeks. This was an organisation set up in 1998 called the British Educational Technology agency. I did a lot of work with them over the years I was a schools adviser in e-learning. The last three months have shown us the amazing disparity in provision for children through the use of technology. In a statement made in May 2010, Becta’s chairman, Graham Badman said “Our procurement arrangements save the schools and colleges many times more than Becta costs to run. Our Home Access programme will give laptops and broadband to over 200,000 of the poorest children.” (Becta, the first quango to be cut, closes its doors.)

We are 10 years on from that statement being made and nothing ever replaced BECTA, with provision across the country being patchy at best. There have been calls for BECTA to be reinstated ever since it was scrapped (Ambition Institute, 2017, Tony Parkin). Indeed, the regular call for improved digital skills development across the educational sector would suggest that an overarching organisation, covering hardware, software, training and technical support would be very welcome. (We are facing a huge UK digital skills gap, 2018)

In the lockdown period, we have seen schools that have embraced the technology, allowing for synchronous sessions, creative approaches and full engagement with their pupils. At the other end of the scale has been an intermittent barrage of ‘worksheets’ with no real personal contact with the pupils – and sadly, the latter experience has been true for many pupils, from a variety of backgrounds. The reasons given for the lack of connection have been around a lack of software, lack of training and safeguarding issues. I do not know which of these is really true.

BECTA had its faults, as any organisation does. (Becta, does it deserve to die?) but I can’t help wondering whether, if we still had a BECTA-type organisation, we would have been much better prepared, both to deal with digital poverty amongst so many communities, but also to support the wellbeing of all our children through regular connection with their teachers and their peers. And, there is still the thorny issue of our young people not being prepared to enter the digital world that we live in.

Advertisement

Learning Technologist of the Year – 2nd place in Individual Category

Last week, I was hugely honoured to be awarded second place in Learning Technologist of the Year (2018) in the Individual category.

It began by an application in June 2018, which was a Google form. It took a lot of thinking about an a lot of planning – and my first thought was that I wished I had been more systematic about collecting feedback and evidence of the work that I had been doing. I knew that the work I was doing as in Assistive Technologies and Accessibility at Huddersfield University was having a positive impact, as people kept telling me, but I had to collect that information to support my application.

I had felt for some time that what we were doing at Huddersfield University was different. My role was located in Computing and Library Services, but the majority of my work was with Disability and Student Services. This meant that I could be a ‘bridge’ between the two departments and had ways of influencing both sides and working together with colleagues in both situations.

In July 2018, I was invited by the Panel to an Interview in Milton Keynes at the Open University, where I was interviewed by 4 of the Panel for the award. I kept telling myself ‘It’s not a job interview – you’re already doing OK’ – but it didn’t make it any less nerve-wracking. I wanted to give the panel a taste of some of the work I was doing with disability and accessibility, so on arrival, I gave all the panel a blindfold and I introduced my presentation using JAWS software, so they heard me opening the presentation and reading the first part, but they couldn’t see what was on the screen. A large part of my work last year was with VI students and it was great to be able to share a little of that with the panel.

In August 2018, I heard that I was a finalist! Great excitement and astonishment and a booking for ALT-C. This also coincided with a big move for me – up to Stirling University in Scotland. It had all happened rather quickly and so I was in the strange position of being a finalist for the role I had actually now completed whilst trying to start a new job.

September 2018 came around very quickly and I set off down to Manchester. I felt sick with nerves. For me, this award wasn’t so much about ‘me’ as wanting to raise the profile of what could be achieved when an inclusive approach is taken to software and accessibility. I had learned that placing these services at the heart of what we do means that some students gained in independence and needed less support because the software and technology they needed were readily available. I also learned that software that is often billed as being ‘assistive’ can be useful for everybody (eg MindView, Read&Write, Sonocent Audio NoteTaker)

I was completely overwhelmed to get the award. A huge rush and mix of emotions as I had left the job that I had the award for and yet gained the recognition that it was a job well done, that the hard work really was having an impact. I can’t thank Huddersfield enough for the support they gave the ‘HudStudy’ project. I was given the space and the resources to develop something new and exciting, which will live on for the benefit of students at the University in the future. Even though I have now taken on a new role, I am passionate about technology NOT being a barrier to students as they learn and about the provision of readily-accessible materials and software which can be enabling for the disabled learner.

A BIG thank you to ALT for organising the awards process, which gave me a lot to think about and reflect on; if you know the work you are doing is valuable, I would highly recommend that you apply next year – just make sure that you document and evidence everything you do. Also a HUGE thank you to Huddersfield University for supporting the development of ‘HudStudy‘.

award

Academic Referencing for blind or visually-impaired students, using NVDA or JAWS

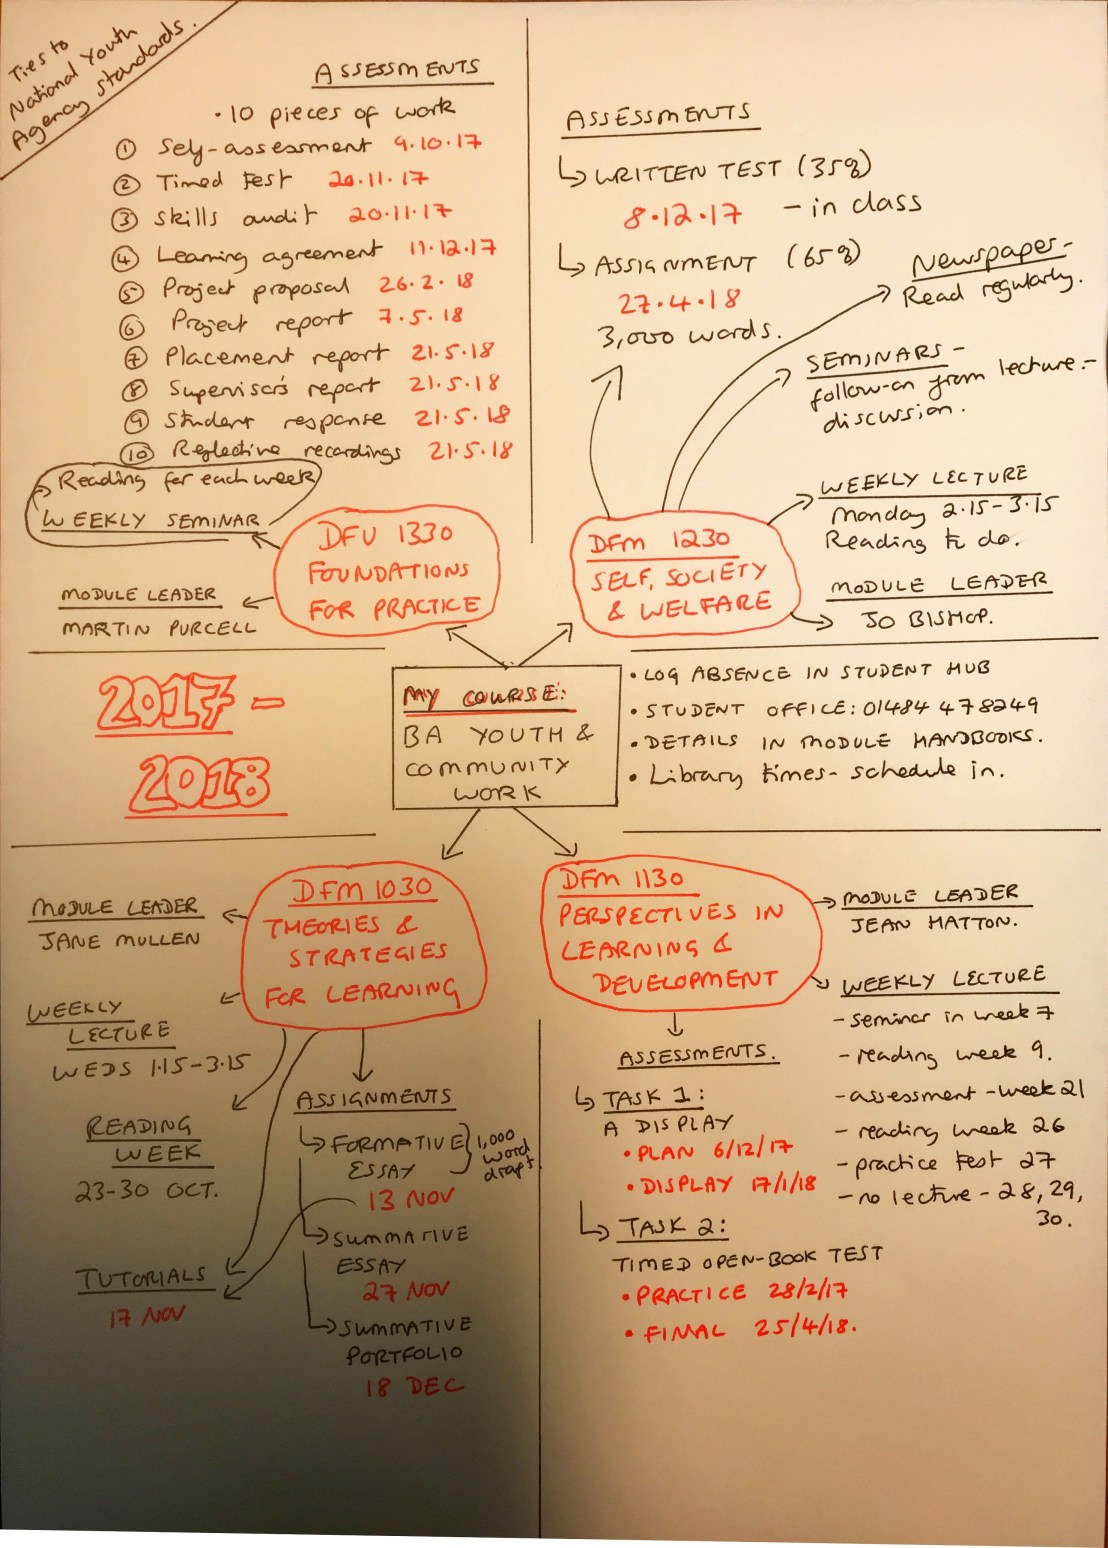
Ros Walker & Samuel Kacer

This year I have worked with several blind / visually-impaired students who have found academic referencing hard work – actually, who doesn’t?

I have produced a short guide to using the Referencing Tab in Word with NVDA and JAWS – it seems to work in both. I couldn’t find this information anywhere else in a simple format. I produced a first version and this has been revised by Samuel Kacer, an NVDA user. I would add that this is best taught with a librarian who can also discuss and explain referencing as a whole, but these are the buttons to press to bring up the sections that you need.

Aims:

  • To create and manage a list of your academic sources.
  • To use your list in citations or as references in you work in Word.
  • To create a Bibilography at the end of the work, showing your sources.

Introduction

Using sources correctly is an important part of academic work and collecting your sources as you read is important. We reference academic work so that others can see accurately where our ideas have come from and so that they can revisit the original work or contact the author if they need to. Please note that this guidance is not designed to teach you everything you need to know about referencing. You should still work with an academic tutor or librarian about your referencing needs, but this guidance will give you a good way of recording your sources and using them in your work. Word has a good, basic tool for managing referencing, which is on a tab called the References tab, although we should think of it as being the Sources tab, as it is accessed through the letter S.

Summary of most important keys:

Alt+S gives access to the references tab in Word

Then M gives the Source Manager

C gives the list of references for citations

B gives the bibliography.


Detailed Guidance

1.     To open the references tab in Word

To get to the references Tab in Word:  alt+S

2.     To open source manager

To open a dialogue box called ‘Manage Sources’:  press M (Note, a dialogue box is a box which sits on top of your current page. You cannot use your page whilst it is open.)

This box contains your database of sources or references. It is made up of records. You will use one record for each source or reference. Each record contains fields. For example, you may have 20 sources or records, but each one has fields like author, title, date, publisher.

There are two areas in this box. The first is the Master list, which is all your sources. Once created, this is present in the background for every Word document. The second is the Current List. This is a list of the sources that you are using in the particular Word document that you are working in. When you add a new source, it appears in both lists in that Word document. If you move to another Word document, and you want to use a reference, you may need to copy it across to your ‘current list’ to use it in citations.

To close the source manager at any stage, you can press escape and the dialogue box will close.

3.     To add a new reference/source in the Source Manager

To create new source record: ALT+N

This opens on the field for the type of source (eg book, book chapter, journal article etc.) To select the type of source, use the up and down arrow keys. Press tab to move to the next field.

If you need to revisit your source as you are entering details, press Alt+Tab and select the source file. Use Alt+tab to return to your word doc and continue adding the details.

Depending on the source type you have chosen, you will then get different fields to complete the record. Press tab to move to the next field.

When you hear Author: type in the name of the author, with the surname, firstname or sometimes surname, initial (eg. Brown, Peter or Brown, P)

If your author is an organisation (eg Department for Education), you can tick the box that says Corporate Author. To tick the box, press the space bar.

Continue to Tab through the remaining fields, adding the information about the source as you go.

Towards the end of the record, there is a field that says ‘Show all bibliography fields’. If checked, this adds a lot of extra fields, which are, in general, not necessary – so ignore it.

The next is a field called ‘Tag Name’ – this is also not needed, so tab again.

When you get to OK, press enter to save and close the record.

Note: You can press enter at any stage of the entry process without going right to the end and the record will be saved and the dialogue box closed.


4.     To move an item from your Master List to your Current List, select it in the Master list


Note: an item added in a document will automatically appear in both lists for that document. You only need to do this if the item was added originally in another Word document.

To open your Source manager: M

It opens automatically in your Master List. Use the up and down arrows to find the reference that you want to use in this assignment. Press alt+C to copy it to your current list.

Tab to close button and press enter.


5.     To edit a source:

To open your Source manager: M

It opens automatically in your Master List. Use the up and down arrows to find the reference that you want to edit. Press alt+E to edit.

Move around your form using tab to move down through the fields (or shift+tab to move upwards) and make your corrections.

Tab to close button and press enter.

Note: You can press escape at any stage when editing and the dialogue box will close, without changing any edits. Or, you can press enter after making your changes and the box will close and save your changes.


6.     Choose your referencing style.

You will need to find out from your tutor which style they want you to use. APA and Harvard are the most common.

Open the Sources toolbar: Alt+S

Choose the list of possible referencing styles: press L

Use arrow keys to select your referencing style.

Press enter when you hear the style that you need.


7.     To add a citation in your work

Working in your Word document, add a citation. This can be in a couple of formats, either a direct or indirect quote.

“Researchers have found that most people like chocolate.” OR

In research, it has been found that most people like chocolate.

You will want to add where this information has come from.

After your direct or indirect quotation,

Type in your direct or indirect quotation.

Open the Sources toolbar: Alt+S

Open the citation list (which gives your possible sources): press C

Use the arrow keys to move up and down until you hear your reference, then press enter.

This adds the reference to the source as, for example, Brown (2007


8.     To add your references list at the end of your work

Go to the end of your work.

Open the Sources toolbar: Alt+S

To open the bibliography menu: press B

You can choose whether you want Bibliography, References or works cited. Choose the one you want and press enter.


Mapping your University Course

Arriving at University can be totally overwhelming, with a huge amount of information to take in very quickly. One thing that can help is having a clear overview of what your course looks like. It’s important for the way you organise your studies and can be really helpful in guiding how your set up your digital resources, like folders on your computer.  This is also useful at the start of each University year. It is likely that you will be taking a number of modules and mapping these, with some key information about each one, can give you a visual reference point to help you understand your course.

You could begin with something really simple like this- just the title of your course and the modules that you are taking:

18_01_2018 13_51 Office Lens (003)

You may want to do a slightly more detailed one, which could involve looking at information like a Module Handbook, which is often given to you or stored in your VLE (UniLearn at Huddersfield University). These booklets are sometimes neglected, but looking at them at the start of the course will give you a real clear idea of what you will be doing, what is expected from you and many of your key dates.

handdrawn map of course v2

It took about 2 hours to pull out all this information, but it means that you know exactly where you are in your course. It is useful to cross-reference the dates straight onto a calendar or into your mobile phone calendar if you can.

You can then take this further if you want with software like MindView 7.

My Course BA Youth and Community Work

A map like this is ideal to print off and keep on your study wall, or on the front of a file. You can do more detailed ones for each module if you want. This does then help you with setting up your electronic filing system as well:

Folders for modules

With a folder for each module, you should keep all those documents in order. And, you can always add sub-folders inside each one – like:

  • Lecture notes
  • Assignments
  • Reading
  • Seminars

Hope this helps with your organisation and if you need any support with your file management or with MindView, and you are at Huddersfield University, you can contact me through HudStudy.

Making your PowerPoints accessible to visually-impaired users

I think it is fair to say that PowerPoint is still a major part of teaching in Higher Education. Most lectures centre around a presentation, which has been prepared in advance on PowerPoint.

It is also widely known that many students find it useful, if not essential, to download these PowerPoints before the lecture so that they can prepare themselves for what they may hear – checking out unknown vocabulary, refreshing their knowledge of already-known topics that underlie the lecture or just making copies ready on their laptops or on paper for notes to be taken.

All well and good. Except, it’s not quite that simple for visually impaired students.

PowerPoint presentations can be empty for students who rely on screen-readers, if the content has not been added properly.

Let me explain.

PowerPoint can’t add things that are in text boxes to the outline view, which is what visually-impaired users rely on, because it can be read out loud to them from the computer.

This first image shows a PowerPoint presentation (yes, I know the content is basic, but stick with me!)

My cat_1

If I go to View > Outline View – this is what I see in an inaccessible version – and this is what a blind/visually-impaired student relies on.

My cat_2

If you go to View > Outline View in an accessible version – this is what you see – something that can be read easily with a screen-reader. It hasn’t taken any ‘extra’ work – it’s just used PowerPoint as it is meant to be used.

My cat_3

So, how do we do it? 

The key is DO NOT USE TEXT-BOXES. Use the layouts that PowerPoint gives you when you add a new slide. Although it may look like a text box, these are actually ‘content’ boxes and are included in Outline View. So, go to New Slide and add the layout that you want. Only type within those boxes. If you want to check your PowerPoint for accessibility, go to File > Check for Issues (which is a box under the Info heading) and then choose Check Accessibility. It will highlight any immediate problems.

You should also add ALT text to any images or graphs that you use. This article explains how to do that.


Sonocent and NoteTalker

Yesterday, I attended a day organised by the University of Derby’s Assessment Centre, where we had the chance to look at two pieces of software designed to help with note-taking. Both systems had some similarities. They both work on a mobile device, tablet or laptop in a lecture theatre, and to work well, both recommend an additional directional microphone to capture the lecturer’s voice. I was using an iPhone 7 and actually managed to get a good quality recording using the built-in microphone for Sonocent, but I was in the front row with only a few other people in the room. Both also offered a back-up battery charger pack so that the mobile devices could be recharged during the day. The one from NoteTalker was like a thick credit-card. The Sonocent was a bit chunkier. Both pieces of software can be recommended as part of DSA when the software meets the needs of the students. They can also be purchased  by individuals.

Sonocent was the first of these. In this system, you can colourcode the audio timeline as you are listening, import the presentation slides, add pictures by using the camera on the device and type text.  When I returned to the office, I downloaded and installed the software in less than 5 minutes and was really impressed with the clean interface and the way that the lecture had been ‘chunked’ for me. I was able to transfer the file I had recorded very quickly via Google drive. I then added additional notes, web links, images and finally, if I wanted print out my final version of my notes, giving a very ‘clean’ summary of the lecture. I still haven’t explored all the desktop version has, but it had enough that I could get to grips with it quickly.
Priced at £49.99 for an annual licence (or £149.99 for a perpetual licence.) Nov 2016.

Note-Talker was the second of the presentations.  The app was very easy to install on my phone. The audio quality was noticeably poorer and would have benefited from a directional microphone. You can vary the quality of the capture, but increasing this and changing it to CD quality resulted in the sound capture being like a gabbling alien. The software was very similar but in striking yellow, black and white colours. On this software, I was able to add photos taken with my device, and bookmarks. I could click during the talk, and add a named bookmark. Unfortunately, I wasn’t easily able to transfer off the files that I had recorded- it offered One drive and Dropbox, but I use Google Drive. So, I thought I would just record another file into the desktop version of the software. This failed twice. Had it worked, I would have been able to chunk up my lecture, and a feature not available in Sonocent is the Maths keyboard, allowing me to add equations. I did wonder how valuable this was, when I can use the built-in maths keyboard in Word and then take a snapshot to add to the lecture notes. For me, this software was garish and a bit ‘clunky’ – and the difficulties of installing and running the desktop version have put me off.

On leaving the sessions, our opinions were split with some preferring Sonocent and some Notetalker. Having tested them further, my personal preference would be Sonocent, but of course, we have to look primarily at the needs of our students.

I do have one big question, which relates to both pieces of software. At the University of Huddersfield, we have just introduced lecture capture. This means that students already have a good quality recording of the lecture. I am not sure what additional benefit the note-taking apps give in relation to making the audio recordings. Our students can now review, bookmark and add notes alongside the lecture, although the output from the Sonocent desktop software is superior in quality to that offered at present by the lecture capture software, but it did strike me that a student could take a slide set from a lecture, add Notes into the Notes section, whilst watching the video that had been lecture captured.

Fancy a brew?

This is a real quickie, but I just had to share it. I’ve been doing quite a bit of work in primary schools recently and this came up on my Facebook today. It’s definitely right in our neck of the woods – and I’m impressed that the child recognised three sounds in this word.

broo


Learning to be peer-reviewed

Having recently completed my Masters, and contemplating the possibility of an academic career, I realised that I needed some publications to my name, something more than the book chapters, book reviews and blog that I occasionally write. My thesis had more than enough material to create an article and my tutor pointed me in the direction of a worthy, international, peer-reviewed journal (Research in Learning Technology). More blood, sweat and a considerable number of tears and I had 5,000 words which I considered to be worthy of publication. I sent it off and waited…..and waited….and waited….(this was worse than waiting for exam results)….and eventually, I got an email. It told me that my publication had been accepted, subject to a few changes. I would hear within a week what the changes should be. Three weeks later, another email. It began in a promising way, congratulating me on the acceptance of my article and then the peer reviews followed. I had to read the email three times. I had been reviewed by two people. One seemed to love it and one seemed to hate it. The one who loved it mentioned the ‘in-depth analytical discussion’ and recommended the paper ‘without reservation’. Hurrah! The second, on the other hand, said it was ‘overall a weak critique of current literature, lazy referencing and weak analysis of the collated data.’ The reviewer did not recommend it.

I went for a walk.

Oh, how those words hurt. This was drawn from my Masters dissertation, which had passed and awarded me an MSc. When I went back to look, there were some errors in the referencing but I had been writing this at 11pm after putting two small children to bed and doing the housework. (S)he wasn’t to know this. Nor does it excuse it, but it wasn’t ‘lazy referencing’ – it was ‘tired out, inexperienced referencing’. The literature review had been adequate for my Masters and fully accepted by the other reviewer. I had missed some international research, but mine had been a UK study and I had been advised at an early stage not to look too widely internationally as cultural variations meant the literature may not have been transferable. I was prepared to look again at the analysis, but this had already been presented at two conferences and well-received – and the other reviewer was happy with it.

How could two reviewers have such different perspectives? It was also difficult to know where to go for support. The journal editor did not reply to emails. My University course had finished, but my tutor was brilliant and did support me. I have made changes to the article – and I hope that it will now be accepted, but the process has been far more arduous and emotionally challenging than I had envisaged. The word ‘lazy’ is still living in my head, even though I know deep-down I am anything but!

The article was published in September 2013 and can be viewed here:

“I don’t think I would be where I am right now.” Pupil perspectives on using mobile devices for learning.

http://www.researchinlearningtechnology.net/index.php/rlt/article/view/22116